
【Typescript】axiosのREADME読んでみた Part4【React】
この記事はReactでaxiosを使うために、axiosのREADMEを読んで得た情報をまとまたものです。React×Typescriptのサンプルコードも載せています。
こんにちは!nomurabbitです。今回はaxiosに関する記事です。
Part4の今回はResponseについてです。resolve時、reject時の戻り値、Typescriptの型の解説やサンプルコードを交えて一緒に勉強していきましょう
Response Schema
まずはresolve時のレスポンスについてです。構成は下記の通り。
{
  // `data` is the response that was provided by the server
  data: {},

  // `status` is the HTTP status code from the server response
  status: 200,

  // `statusText` is the HTTP status message from the server response
  statusText: 'OK',

  // `headers` the HTTP headers that the server responded with
  // All header names are lower cased and can be accessed using the bracket notation.
  // Example: `response.headers['content-type']`
  headers: {},

  // `config` is the config that was provided to `axios` for the request
  config: {},

  // `request` is the request that generated this response
  // It is the last ClientRequest instance in node.js (in redirects)
  // and an XMLHttpRequest instance in the browser
  request: {}
}
Typesccriptで見てみると、axiosクラスは下記のように定義されています。
export class Axios {
  constructor(config?: AxiosRequestConfig);
  defaults: AxiosDefaults;
  interceptors: {
    request: AxiosInterceptorManager<AxiosRequestConfig>;
    response: AxiosInterceptorManager<AxiosResponse>;
  };
  getUri(config?: AxiosRequestConfig): string;
  request<T = any, R = AxiosResponse<T>, D = any>(config: AxiosRequestConfig<D>): Promise<R>;
  get<T = any, R = AxiosResponse<T>, D = any>(url: string, config?: AxiosRequestConfig<D>): Promise<R>;
  delete<T = any, R = AxiosResponse<T>, D = any>(url: string, config?: AxiosRequestConfig<D>): Promise<R>;
  head<T = any, R = AxiosResponse<T>, D = any>(url: string, config?: AxiosRequestConfig<D>): Promise<R>;
  options<T = any, R = AxiosResponse<T>, D = any>(url: string, config?: AxiosRequestConfig<D>): Promise<R>;
  post<T = any, R = AxiosResponse<T>, D = any>(url: string, data?: D, config?: AxiosRequestConfig<D>): Promise<R>;
  put<T = any, R = AxiosResponse<T>, D = any>(url: string, data?: D, config?: AxiosRequestConfig<D>): Promise<R>;
  patch<T = any, R = AxiosResponse<T>, D = any>(url: string, data?: D, config?: AxiosRequestConfig<D>): Promise<R>;
}
よく見るとHTTPリクエストを投げる下記のメソッドは、
- request
- get
- delete
- head
- options
- post
- put
- patch
全て下記のような戻り値で定義されています。いずれもresolve時のレスポンスにAxiosResponse型、reject時にany型を返します。
request<T = any, R = AxiosResponse<T>, D = any>(config: AxiosRequestConfig<D>): Promise<R>;
AxiosResponse
export interface AxiosResponse<T = any, D = any>  {
  data: T;
  status: number;
  statusText: string;
  headers: AxiosResponseHeaders;
  config: AxiosRequestConfig<D>;
  request?: any;
}
When using then, you will receive the response as follows:
resolve時のレスポンスの取り扱いはこのようになります。TypescriptでもAxiosResponseを前提とした取り扱いで問題ありません。
axios.get('/user/12345')
  .then(function (response) {
    console.log(response.data);
    console.log(response.status);
    console.log(response.statusText);
    console.log(response.headers);
    console.log(response.config);
  });
また、rejectj時についてはこのような記載があって、
When using catch, or passing a rejection callback as second parameter of then, the response will be available through the error object as explained in the Handling Errors section.
catchやthenの第二引数としてreject時のコールバック関数を渡す場合、つまりreject時の戻り値を扱う場合はHandling Errors sectionに書いてあるようにerrorオブジェクトとして扱ってね、ということです。
Handling Errors
まずは基本的なerrorオブジェクトの扱いから。
axios.get('/user/12345')
  .catch(function (error) {
    if (error.response) {
      // The request was made and the server responded with a status code
      // that falls out of the range of 2xx
      console.log(error.response.data);
      console.log(error.response.status);
      console.log(error.response.headers);
    } else if (error.request) {
      // The request was made but no response was received
      // `error.request` is an instance of XMLHttpRequest in the browser and an instance of
      // http.ClientRequest in node.js
      console.log(error.request);
    } else {
      // Something happened in setting up the request that triggered an Error
      console.log('Error', error.message);
    }
    console.log(error.config);
  });
errorオブジェクトの構造をチェックしながら、処理を決めています。
Using the validateStatus config option, you can define HTTP code(s) that should throw an error.
リクエスト時にconfigのvalidateStatusオプションを指定することで、レスポンスコードによって例外の発生を指定できます。
axios.get('/user/12345', {
  validateStatus: function (status) {
    return status < 500; // Resolve only if the status code is less than 500
  }
})
Using toJSON you get an object with more information about the HTTP error.
axios.get('/user/12345')
  .catch(function (error) {
    console.log(error.toJSON());
  });
toJSON()で取り出すと、errorオブジェクトから取り出せる情報が増えます。
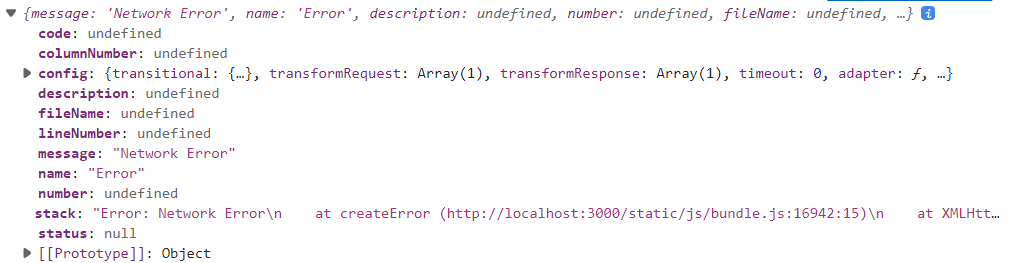
toJSON()なし

toJSON()あり
HTTPリクエストの内容も入ってますし、toJSON()を使うことで便利になりますね!
というわけでresolve時、reject時のレスポンスの扱いについて勉強してきましたが、axiosのREADME読んでみた Part4いかがでしたでしょうか?
次回もぜひご覧ください。では!
参考
axios
github.com